Use Shopify's Web Pixels product_added_to_cart event as your primary method for shopify add to cart tracking. It's the most reliable option across AJAX carts, cart drawers, and quick-add buttons, and it's the one Shopify's own documentation points to as the standard.
Two backups exist for edge cases: fetch interception on /cart/add.js for GTM-first setups, and click triggers as a last resort when neither of the above is possible. Whichever method you pick, success looks the same:
- Events show up in your destination (GA4, Meta, your server) within seconds
- Item ID, SKU, price, and quantity all match what's actually in the cart
- No duplicate fires from the same add-to-cart action
- Values arrive in dollars, not raw cents
If your setup checks those four boxes, you're done. If not, keep reading.
Key Takeaways
Shopify's Web Pixels product_added_to_cart event is the most reliable way to track add-to-cart activity because it works consistently across AJAX carts, drawers, and quick-add flows without theme-specific code.
| Point | Details |
|---|---|
| Choose Web Pixels first | It's theme-agnostic and survives theme updates better than click-based listeners. |
| Use fetch interception for GTM | Intercept /cart/add.js and read prices from the JSON response, not the DOM. |
| Test across every add pattern | Check product pages, quick-add, cart drawers, and upsell modals separately. |
| Watch for duplicate events | Disable redundant listeners so the same action isn't counted twice. |
| Pair tracking with recovery | Once events are clean, tools like StorePush can act on them in real time to re-engage visitors who never shared an email or phone number. |
Table of Contents
- Which Method Should You Use for Shopify Add to Cart Tracking?
- How Do You Subscribe to product_added_to_cart With a Custom Pixel?
- Setting Up /cart/add.js Interception for GTM and Legacy Stacks
- How Do You Test and Verify Add-to-Cart Tracking?
- Why Isn't My Add-to-Cart Event Firing Correctly?
- How Reliable Tracking Feeds Smarter Recovery Workflows
- What the Conventional Advice Gets Wrong About Cart Tracking
- Where StorePush Fits Once Your Tracking Is Clean
- Where to Go for Implementation Reference
- Sources
Which Method Should You Use for Shopify Add to Cart Tracking?
Three approaches cover almost every Shopify store. Pick based on your tech stack, not habit.
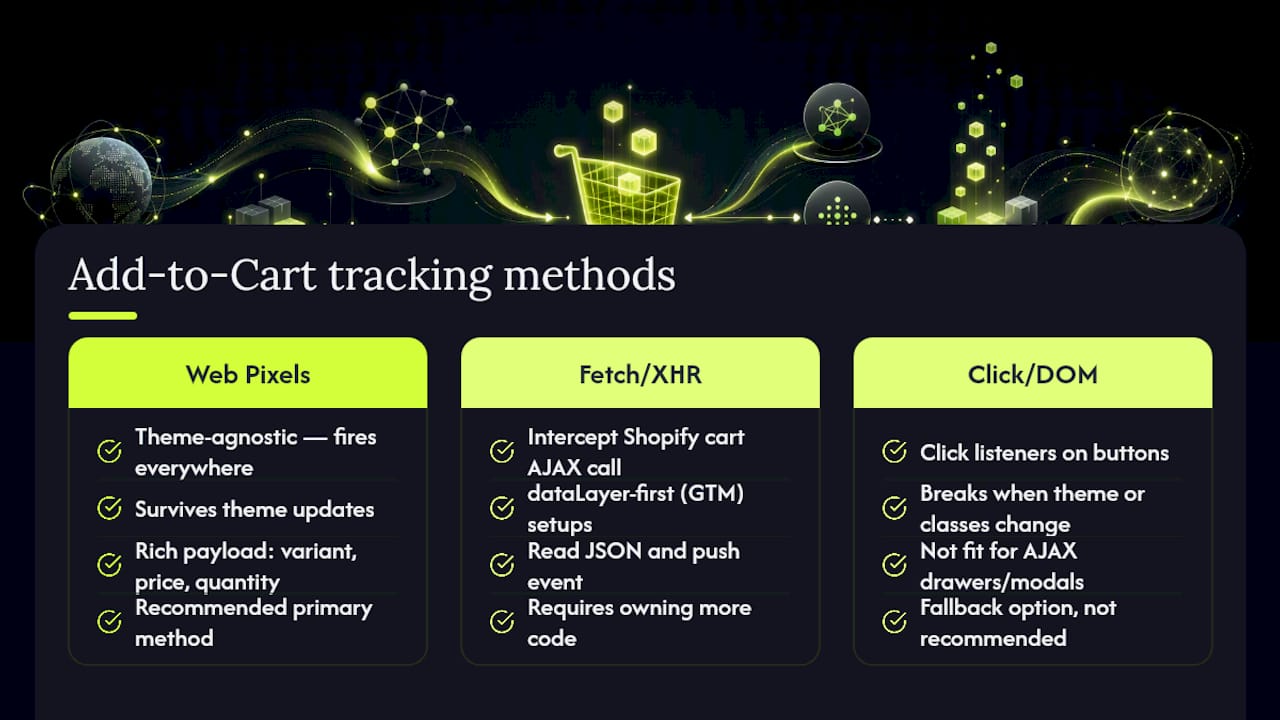
Web Pixels API (recommended). Shopify's product_added_to_cart event is theme-agnostic, meaning it fires the same way whether a shopper clicks "Add to Cart" on a product page, a collection quick-add button, or an upsell modal. Practitioners favor it specifically because it survives theme updates, something DOM-based listeners routinely fail to do. It also delivers a rich payload, complete with variant, price, and quantity data, without you writing custom parsing logic.
Fetch/XHR interception of /cart/add.js. This is your move if you're deep in Google Tag Manager and want a dataLayer-first setup. You intercept the AJAX call Shopify's cart makes, read the JSON response, and push a standardized event. It works well, but it means owning more code.
Click or DOM triggers. This is the fallback, not the plan. Click listeners attached to "Add to Cart" buttons break the moment a theme changes a class name or a merchant installs a quick-add app that renders its own button. Modern Shopify themes lean heavily on AJAX carts, drawers, and modals, and simple click triggers just aren't built for that complexity.
One warning that applies to all three: double-firing. If you run Web Pixels alongside a legacy GTM click trigger, you'll count every add-to-cart twice. Pick one primary method, and if you keep a second as a safety net, make sure it's disabled or clearly separated by event name so it never reports to the same destination.
How Do You Subscribe to product_added_to_cart With a Custom Pixel?
Shopify's custom pixel editor lives under Settings → Customer events in your admin. From there, you create a new custom pixel, choose a permission level (this controls whether the pixel fires for visitors who haven't granted marketing consent), and add JavaScript that subscribes to standard events.
Here's the core pattern:
- Open Settings → Customer events and click Add custom pixel.
- Name the pixel and set its permission level to match your consent requirements.
- Paste in a subscription to the standard event:
analytics.subscribe('product_added_to_cart', (event) => {
  const item = event.data.cartLine.merchandise;
  const payload = {
    item_id: item.product.id,
    sku: item.sku,
    title: item.product.title,
    price: item.price.amount,
    quantity: event.data.cartLine.quantity,
    currency: item.price.currencyCode,
  };
  // send it downstream
});
- Send the payload to GA4 or your own server using
fetchwithkeepalive: true, so the request survives even if the shopper navigates away mid-request. - For GTM, push to the parent window's dataLayer with
parent.window.dataLayer.push(payload), since custom pixels run in a sandboxed iframe and can't touch the parent page directly.
Pro Tip: Custom pixels are sandboxed, which means they can't read cookies or global variables from your theme. If your downstream tool expects session data, pass it explicitly in the event payload rather than assuming the pixel can reach out and grab it.
Test every payload field before you trust it in production. A missing currency field or a price value that's actually in cents will quietly corrupt your reporting for weeks before anyone notices.
Setting Up /cart/add.js Interception for GTM and Legacy Stacks
When Web Pixels isn't an option (older custom app setups, specific GTM-first architectures), intercepting Shopify's /cart/add.js endpoint is your next best route. Every add-to-cart action on a Shopify storefront, no matter which button triggers it, ultimately calls this endpoint. Its JSON response includes line items, variant IDs, and totals.
The pattern: wrap window.fetch (and XMLHttpRequest if your theme still uses it) to watch for calls to /cart/add.js, then parse the response and push a standardized event to the dataLayer.
- Read pricing from the JSON response itself, not from DOM text. Shopify returns prices in cents, so divide by 100 before sending to GA4 or Meta.
- Build a consistent dataLayer object (
event: 'add_to_cart',items: [...]) so downstream tools don't need custom mapping per theme. - Expect ongoing maintenance. Theme updates, new apps, and selector changes can quietly break interception scripts that rely on specific DOM structures alongside the fetch override.
Avoid running this pattern alongside Web Pixels for the same destination. If you're migrating, disable one before enabling the other, or you'll double-count every event.
How Do You Test and Verify Add-to-Cart Tracking?
Confirming your events actually work takes more than a single test click. Run through this checklist:
- Open GA4 DebugView and trigger an add-to-cart. Confirm the event and its parameters appear in real time.
- Check Meta Events Manager's test events tool for the same action, if you're sending to Meta.
- Open your browser's devtools Network panel, filter for
/cart/add.jsor your pixel's outbound request, and inspect the raw payload. - Review Shopify's own event logs in the custom pixel editor for confirmation the subscription fired.
- Repeat across every add pattern: product page, collection quick-add, cart drawer, and any upsell or post-purchase modal.
- Test on mobile and in-app browsers (Instagram, TikTok), where sandboxing behaves differently than desktop Chrome.
Check that item_id, sku, variant, price, and currency code all match the actual cart contents, and that prices are in dollars, not cents. Watch your timestamps too. Events firing milliseconds apart from the same session are a classic sign of a duplicate listener, not two real actions. Recording timestamps in ISO 8601 format keeps cross-system comparisons clean when you're reconciling logs later.
Why Isn't My Add-to-Cart Event Firing Correctly?
Most tracking failures fall into five buckets:
- Consent mismatch. Your pixel's permission level requires marketing consent, but the visitor hasn't granted it, so the event silently never fires.
- AJAX/drawer adds not registering. A click listener misses drawer-based adds entirely. Switch to Web Pixels or
/cart/add.jsinterception instead. - Zero or wrong price value. Usually means you forgot to convert from cents, or you're reading the wrong currency field.
- Duplicate events. Two tracking methods report the same action. Audit your pixel list and disable the redundant one.
- Third-party apps bypassing the standard cart. Some subscription or bundle apps use their own add-to-cart flow that skips Shopify's native cart entirely, requiring an app-specific listener.
Pro Tip: Before debugging code, check consent settings first. A surprising share of "broken tracking" tickets turn out to be a pixel correctly respecting a visitor's consent choice, not a bug at all.
How Reliable Tracking Feeds Smarter Recovery Workflows
Clean add-to-cart data isn't just a reporting exercise. It's the trigger mechanism behind real recovery workflows, webhooks, push notifications, and abandonment flows that all depend on knowing the moment intent happens, not an hour later when a checkout report catches up.
Shopify's abandoned checkout records only capture visitors who've entered contact information. Everyone who adds to cart and leaves before checkout, often the majority of would-be buyers, never shows up there at all.
That gap is exactly where operational recovery tools built on live event data, rather than retrospective reports, earn their keep.
What the Conventional Advice Gets Wrong About Cart Tracking
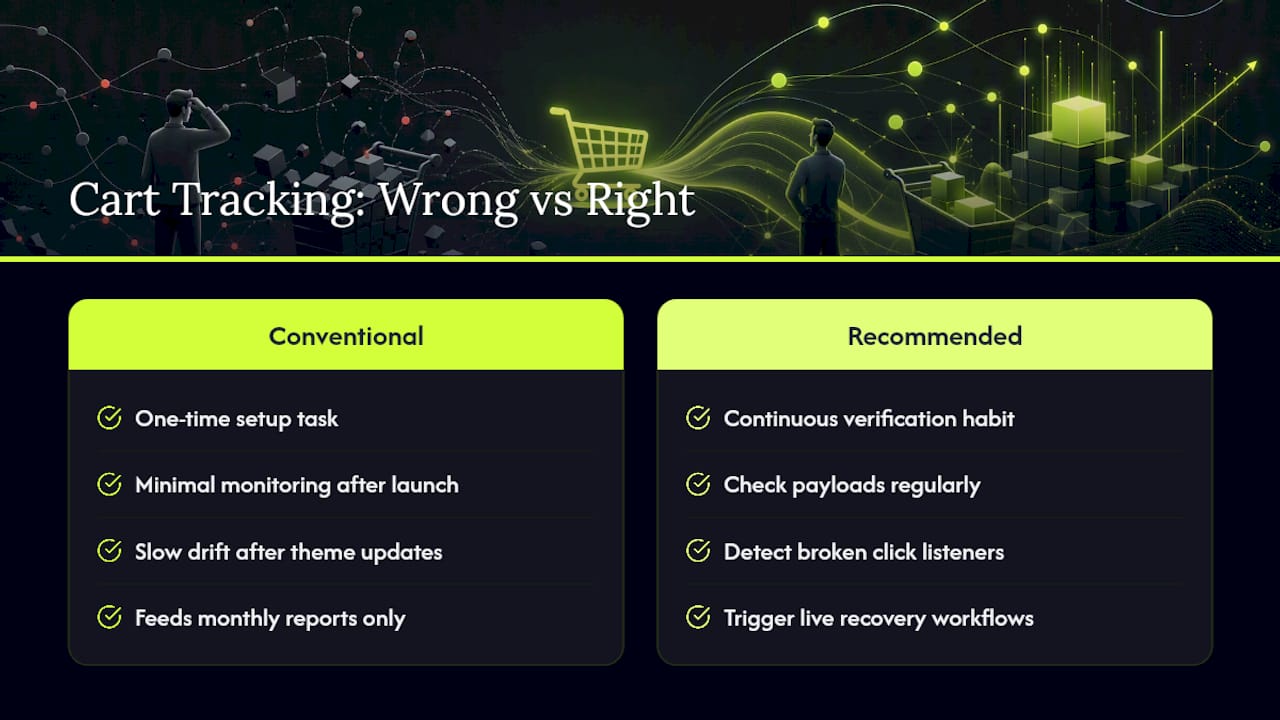
Most guides treat add-to-cart tracking as a one-time setup task: install a pixel, check a box, move on. That's backwards. The real risk isn't getting it wrong on day one, it's the slow drift that happens six months later when a theme update quietly breaks a click listener nobody's monitoring anymore.
The bigger blind spot, though, is treating tracking as purely a reporting exercise. Store owners obsess over dashboard accuracy while ignoring that the same event data can trigger action in real time. An add-to-cart signal that only feeds a monthly report is worth far less than one that feeds a live recovery workflow the moment a shopper hesitates.
If you take one thing from this guide, prioritize Web Pixels first for its durability, then build your verification habit around checking payloads regularly, not just at launch. Shopify's own checkout analytics improvements are genuinely useful, but they only cover checkout-stage behavior. Everything that happens before checkout, the actual add-to-cart moment where most drop-off originates, still depends on the instrumentation you build yourself.
Where StorePush Fits Once Your Tracking Is Clean
Fixing your event tracking tells you that shoppers are adding to cart and leaving. It doesn't do anything to bring them back. That's a separate problem, and it's the one StorePush was built to solve.
Rather than relying on an email or phone number you may never collect, StorePush uses native iOS App Clips to deliver lock-screen push notifications to shoppers who've already engaged, no signup form required. That matters most for the visitors your add-to-cart events reveal but your email list never captures: the browse-and-leave crowd that makes up the vast majority of traffic. Once your Web Pixels setup confirms an add-to-cart event, that same signal can trigger a re-engagement push within minutes instead of waiting on a nightly abandoned-checkout report.
If you've just cleaned up your tracking and want to see what happens when that data actually drives action, book a demo and see how push-based recovery slots into your existing stack.
Where to Go for Implementation Reference
- product_added_to_cart event docs
- AJAX Cart API reference
- Standard events and actions guide