Use a Viewed Product trigger, layer intent filters on top of it, and suppress anyone who added to cart, started checkout, or purchased since that view. Skip the broad Active-on-Site trigger; it fires on too many low-intent sessions and floods your inbox slot with noise. Done right, this gives you a lighter-touch sequence that nudges consideration-stage shoppers forward without stealing credit (or revenue) from your cart recovery flow.
TL;DR:
- Using Viewed Product triggers with intent filters prevents false positives from broad site activity, focusing on genuine browse abandonment.
- Confirm event payloads include product image, name, price, URL, and category, and verify server-side tracking to avoid missed sessions.
- Implement a three-gate suppression pattern based on timing, category, and shopper intent, checking gates at send time to prevent irrelevant emails.
- Send browse abandonment emails shortly after view, with a maximum of three contacts spaced over a few days, prioritizing relevance over discounts.
- For anonymous traffic, native push notifications with suppression rules offer an alternative re-engagement channel when email capture is weak or absent.
Table of Contents
- What Counts as a Browse Abandonment Trigger?
- How to Set Up and Verify the Trigger Across Shopify, WooCommerce, and BigCommerce
- Filtering Out the Noise: The 3-Gate Suppression Pattern
- Timing and Cadence: When to Send and How Often
- What to Put in Each Email (With Subject Line Patterns)
- Measuring Whether Your Browse Flow Actually Works
- Pre-Launch Checklist and Common Fixes
- What Anonymous Browsers Change About This Playbook
- The Real Lesson in Browse Abandonment Data
- Reaching the Shoppers Your Email Flow Never Sees
- Where to Verify the Details in This Guide
- Sources
What Counts as a Browse Abandonment Trigger?
Most platforms expose two candidate events for this flow: Viewed Product and Active on Site. Only one of them belongs in a browse abandonment flow.
Klaviyo's own setup guidance recommends Viewed Product because it's tied to a specific item, which lets your email pull in that exact product image, name, and price. Active on Site tracks general site presence and can't populate a dynamic product block, so it produces generic "come back" emails that convert far worse.
Before you turn on any flow, confirm the event payload actually carries what your email template needs:
- ImageURL (full resolution, not a thumbnail placeholder)
- ProductName
- Price
- ProductURL
- Category (useful for filtering and cross-sell logic later)
Two things break this quietly. First, client-side cookie tracking misses shoppers on strict privacy browsers or ad blockers, which means the event never fires at all. Second, even when it fires, missing properties (a blank ImageURL is the usual culprit) cause the dynamic block to render empty in the email. Server-side event capture through your platform's app or API closes both gaps, catching sessions that client-side pixels drop entirely.
How to Set Up and Verify the Trigger Across Shopify, WooCommerce, and BigCommerce
Getting the trigger live takes three checkpoints, regardless of which platform you run.
- Confirm the event name and payload. Open your flow builder, select Viewed Product as the trigger, and send yourself a test. Check that ImageURL, ProductName, Price, and ProductURL all populate. According to Klaviyo's technical setup documentation, dynamic blocks fail silently when even one property is missing. Don't skip this step because the flow "looks" active.
- Verify tracking is actually installed. On Shopify or BigCommerce, this usually means confirming the platform's app embed or tracking snippet is enabled storewide, not just on your homepage. For WooCommerce browse flows, check that your event tracking plugin fires on the product template and not just the shop archive. If a meaningful share of your traffic browses without cookies persisting (returning app users, privacy browsers), add server-side capture so those sessions still register.
- Preview with a live event, not a fake one. Trigger a real Viewed Product event from your own test account, then preview the email against that specific event. Click every link. A ProductURL that's slightly malformed will pass QA visually and still send shoppers to a 404 page in production.
Run this same three-step check any time you touch the flow's template or add a new product template type, since layout changes are the most common way payload fields silently stop mapping.
Filtering Out the Noise: The 3-Gate Suppression Pattern
A browse flow that fires on every product view will annoy shoppers and cannibalize your cart recovery revenue. The fix is filtering aggressively, both at entry and again right before send.
Start with intent thresholds. A single accidental click shouldn't trigger an email. Requiring a dwell time of 90 to 180 seconds or a repeat view of the same product within one session filters out bounce clicks and bot traffic, based on setup patterns pixeltree documents for Klaviyo flows. This alone eliminates a large share of false triggers before you even think about email content.
From there, apply what amounts to a 3-gate suppression pattern:
- time gate: don't send if a purchase or cart action happened since the trigger.
- category gate: don't send if the shopper already received a browse or cart email for that same category recently.
- intent gate: don't send if the shopper has since added to cart, started checkout, or completed the purchase.
The critical detail most teams miss: check these gates at send time, not just at flow entry. A shopper can enter the flow, then add the item to cart an hour later while your delayed email is still queued. Omnisend's browse abandonment documentation recommends exit conditions and frequency controls precisely because state changes mid-flow, and a conditional split before each send step catches that.
Pro Tip: Set a re-entry throttle every few days per shopper and a Smart Sending window that blocks overlap with any other active flow. Without both, the same person can land in your browse flow and a promotional campaign on the same afternoon.
Timing and Cadence: When to Send and How Often
Browse abandonment moves at a different speed than cart recovery. Shoppers who viewed a product but didn't add it to cart are earlier in their decision, so hitting them with urgency and a discount code within the hour reads as desperate, not helpful.
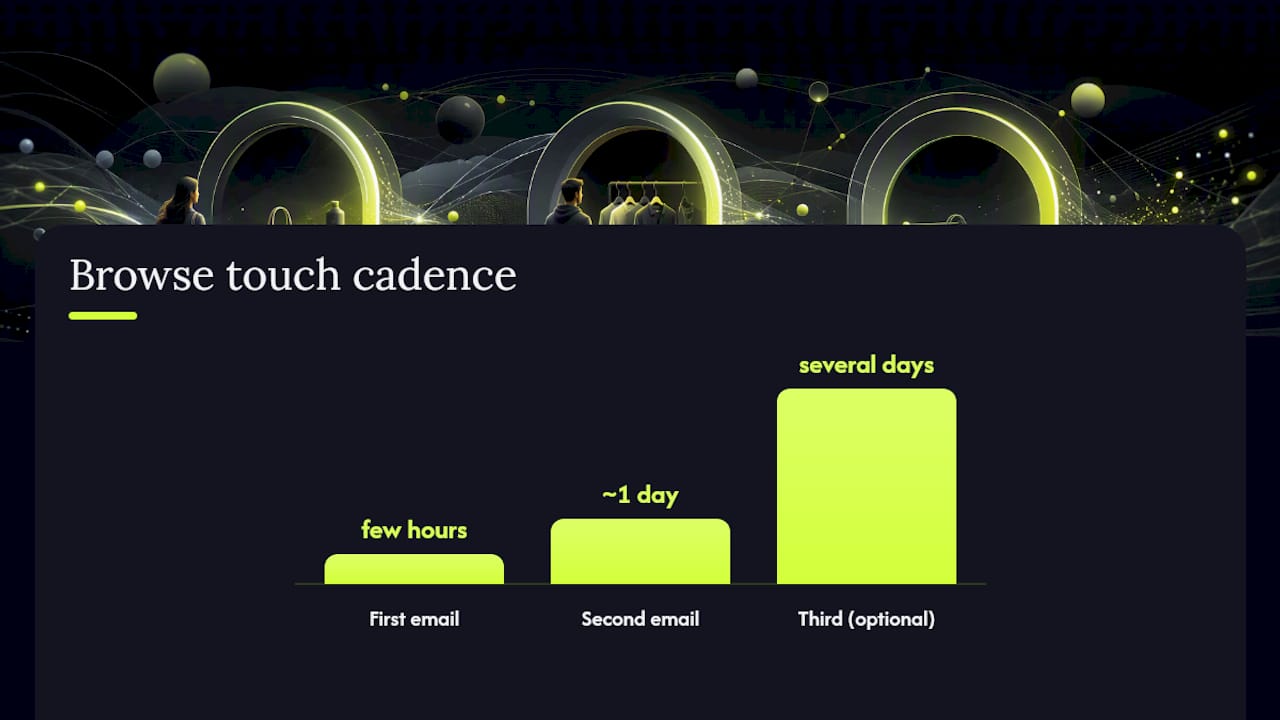
A cadence that works for most catalogs:
- First email: within a few hours after the view, close enough that the product is still fresh in memory, far enough that it doesn't feel like a tripwire.
- Second email: about a day later, if they haven't clicked or purchased.
- Optional third touch: several days out, reserved for higher-consideration categories like furniture or electronics.
Mailchimp's guidance on browse abandonment sequences backs this shorter, lighter pattern: a reminder, a social-proof follow-up, and an optional final nudge, rather than the five-touch cadence common in cart recovery.
Hold the discount. Early browse emails convert better on relevance and reassurance than on a coupon, since a shopper still deciding between two products needs information, not a price cut. Coordinate channels carefully too: run email first, and only bring in SMS or push after explicit consent, staggered by a few hours so the same shopper doesn't get an email and a text about the same product within minutes of each other.
What to Put in Each Email (With Subject Line Patterns)
Content matters as much as timing here, and the two browse emails should do different jobs.
- Email 1: reminder, not a pitch. Lead with a large hero image of the exact product viewed, one clear line on the main benefit, and a single call to action, usually "View It Again" or "Back in Stock Soon." Skip the discount entirely. Add two or three complementary items below the fold. Real-world formatting patterns for this layout are collected in Mailcharts' browse abandonment email library, which is worth a scroll if you're stuck on layout.
- Email 2: proof, not pressure. This is where reviews, user-generated photos, or a sizing/fit guide earn their place. Someone still on the fence usually needs reassurance that other buyers were happy, not another look at the same product shot. Repeat the CTA. If you're going to test a discount at all, this is the email to test it in, and even then, treat it as an experiment rather than a default.
Subject lines follow a similar split. For email one, name the product or category directly: "Still thinking about the [Product Name]?" works better than a vague "You left something behind." For email two, curiosity earns a slightly higher open rate: "Here's what other buyers said about it." A first-name personalization token helps in both, but only if your data is clean. A broken merge tag ("Hi {FirstName},") does more damage than no personalization at all.
For the actual copy inside each CTA button, small wording changes move click-through more than most marketers expect, and this breakdown of high-converting CTA patterns is a useful reference if you're testing beyond the basics.
Measuring Whether Your Browse Flow Actually Works
Standard open and click rates tell you engagement, not incremental revenue, so track a slightly wider set of numbers.
- Entry-to-click rate, to gauge whether your suppression gates are even letting qualified shoppers into the flow.
- Conversion rate of recipients and revenue per recipient, which matter more than raw open rate for justifying the flow's existence.
- Unsubscribe rate, since browse flows sent too aggressively drive list fatigue faster than any other automation.
- Cross-flow overlap, meaning how often a recipient also entered your cart or checkout flow around the same time.
The single most reliable way to know your true impact is a randomized holdout of 1 to 5% of qualifying traffic that never enters the flow at all. Compare their purchase rate against the flow recipients over the same window. The martech cookbook's browse abandonment recipe treats this kind of intent scoring and holdout testing as essential precisely because attribution without a control group tends to overstate the flow's real contribution. If your reported revenue looks unusually high, check for suppression leakage first. That's almost always where inflated numbers come from.
Pre-Launch Checklist and Common Fixes
Run this before you flip the flow live, then again a week after.
- Pre-launch: confirm event payloads (ImageURL, ProductName, Price, ProductURL, Category) populate correctly, activate all three suppression gates, turn on Smart Sending, and set your re-entry throttle.
- Post-launch, week one: send yourself test emails from real triggers, then pull the last 50 recipients and check how many also entered your cart flow around the same time. High overlap means a suppression gate isn't firing.
- Common breakages: a mistyped or renamed event (the flow silently stops triggering), a missing ImageURL that leaves the product block blank, and duplicate sends caused by a missing re-entry throttle. Adding a zero Added-to-Cart filter since the trigger fired is the single most common fix when browse and cart flows are cannibalizing each other.
What Anonymous Browsers Change About This Playbook
Every rule above assumes you have an email address to send to. A large share of browsing traffic never gives you one. That's where push notification re-engagement through native iOS App Clips, the approach StorePush is built around, becomes a useful adjacent channel: it can reach a shopper's lock screen without requiring an email or phone number captured up front.
The suppression logic doesn't change just because the channel does. If a shopper viewed a product and later added it to cart or checked out, that push should get suppressed exactly like an email would. Lighter cadence still applies too. The intent gates you built for your email flow are the same ones that should govern any anonymous re-engagement channel you layer on top.
The Real Lesson in Browse Abandonment Data
The biggest mistake teams make with browse abandonment isn't the trigger choice. It's treating every product view as equal intent. A shopper who dwelled 40 seconds and bounced is not the same as one who viewed the same product twice in one session, and a flow that sends to both at the same cadence will always underperform.
Conventional advice tends to focus on template design, subject lines, and discount timing. Those matter, but they're downstream of the real lever: intent scoring and suppression discipline at the gate. Get the thresholds and the 3-gate pattern right, and a mediocre template still recovers real revenue. Get them wrong, and even a beautifully designed email just annoys people who were never close to buying.
If there's one place to start, it's suppression checks at send time, not entry time. That single fix resolves most of the cart-cannibalization complaints I see teams raise about their browse flows. Everything else, from cadence to copy, is optimization on top of a foundation that either holds or doesn't.
— Lucas
Reaching the Shoppers Your Email Flow Never Sees
Email browse flows only work on shoppers who gave you an address, and most don't. Another option to re-engage anonymous shoppers is sending push notifications straight to a shopper's lock screen using native iOS App Clips, without requiring an email, phone number, or app installation. Such solutions may integrate with Shopify, WooCommerce, BigCommerce, and custom storefronts, and include suppression logic covering revenue attribution, funnel tracking, and event-based triggers that respect cart and checkout state.
If your anonymous traffic share is high or your email capture rate is weak, this is the channel that catches what your browse flow structurally can't reach. Book a demo to see how the suppression rules map onto push, or visit the StorePush product page to check integration details for your platform.
Where to Verify the Details in This Guide
The setup steps and filter logic above draw on platform documentation you can check directly: Klaviyo's browse abandonment flow guide for event and property requirements, Omnisend's automation documentation for audience filters and exit conditions, and Mailchimp's resource on browse abandonment emails for cadence and content structure. For suppression and intent-scoring logic specifically, the martech cookbook's browse abandonment recipe is worth bookmarking. For WooCommerce store owners, WooCommerce's own developer documentation covers the category and attribute data available for scoping flows.