Yes, App Clips support Apple Pay: the system presents the native Apple Pay sheet inside the App Clip, and users confirm with Face ID or Touch ID for a near-instant checkout. For merchants, that means a shopper can tap a link, scan a code, or launch an App Clip and finish a purchase in seconds, with zero app install and minimal typing. For developers, it means the same PassKit APIs you already use in a full app, just wired into a smaller, faster runtime.
TL;DR:
- Apple Pay inside App Clips offers the same secure, encrypted checkout experience as in full apps, pulling contact and payment data directly from Wallet.
- Developers need to register a merchant ID, create an App Clip target, and implement PassKit APIs, with thorough testing using device checks and actual invocation URLs.
- Shopify’s Checkout Kit simplifies integration by embedding the native checkout sheet, managing payment flow, and ensuring branding consistency without handling UI themselves.
- The Apple Pay button should appear early in the experience, on product or cart pages, to maximize conversion, while error handling should be user-friendly and contained within the payment sheet.
- Size optimization is critical, with a recommended target under 10MB, requiring dependency pruning, asset compression, and careful code sharing to maintain instant launch speeds.
Table of Contents
- What Happens When You Use Apple Pay In An App Clip
- How Do You Set Up Apple Pay Inside An App Clip?
- Connecting Checkout Kit To Your App Clip On Shopify
- Where Should The Apple Pay Button Go?
- Debugging The Most Common Apple Pay Failures In App Clips
- Keeping Your App Clip Small Enough To Launch Instantly
- What Happens After The App Clip Checkout Ends?
- How App Clip Checkouts Set Up Smarter Re-Engagement
- Practical Trade-Offs Worth Weighing Before You Ship
- Turning App Clip Checkouts Into Recovered Revenue
- Sources
What Happens When You Use Apple Pay In An App Clip
The moment a shopper taps the Apple Pay button inside an App Clip, iOS takes over the screen with the standard payment sheet: a card image, order total, shipping method, and delivery or contact details, all pulled from Wallet. There's no separate login screen, no account creation, no address form to fill out by hand. The shopper reviews what's already there, taps to confirm, and authorizes with Face ID or Touch ID. That's the entire checkout.
This works because Apple Pay inside App Clips pulls the same secure credentials and contact data from the device that it would in a fully installed app. Nothing about the security model gets watered down for the lighter-weight experience. Apple Support confirms that a payment made in an App Clip uses identical security and privacy protections to a payment made in a full app, including device-level authorization and encrypted payment tokens that never expose raw card numbers to the merchant.
Where this typically fires:
- App Clip Codes, the scannable badges you'll see on packaging, posters, or in-store displays.
- NFC tags, tapped with a phone near a product, a table, or a checkout counter.
- QR codes and digital links, shared in ads, texts, or social posts.
- Smart App Banners, appearing on a merchant's mobile website when Safari detects an associated App Clip.
Apple's own retail team leaned into this with the Apple Store app's scan-and-go self-checkout, where shoppers scan a product's App Clip Code, get a lightweight checkout experience, and pay with Apple Pay without opening the full Apple Store app. It's a useful mental model: App Clips exist for the moment someone wants to buy something right now, not for building a relationship over multiple sessions.
How Do You Set Up Apple Pay Inside An App Clip?
Getting Apple Pay working inside an App Clip is mostly the same as wiring it into a full app, with a few App Clip specific wrinkles around size and target configuration. Here's the sequence that avoids most of the rework developers run into.
- Register a merchant ID and generate a payment processing certificate in your Apple Developer account. This identifies your business to Apple Pay and has to be done before any PassKit code will function.
- Add an App Clip target in Xcode. Apple's own guidance on App Clip targets and invocation handling covers how to scope the target correctly, share code between the App Clip and the full app, and register invocation URLs the App Clip should respond to.
- Build a
PKPaymentRequestor usePKPaymentAuthorizationControllerinside the App Clip target to actually present the Apple Pay sheet. This is the same PassKit surface you'd use in a full app; the difference is you're calling it from a much smaller binary with a tighter dependency graph. - Wire the resulting payment token to your payment service provider or backend. Implement clear success and failure callbacks so the App Clip UI reflects what actually happened, rather than leaving the shopper staring at a spinner.
- Keep the App Clip target lean. Share code carefully rather than pulling your entire app's dependency tree into the target. Every megabyte you add here works against the instant-launch experience that makes App Clips worth building in the first place.
Before you ship anything, run through a short testing checklist:
- Call
canMakePayments()to confirm Apple Pay is even available on the test device. - Call
canMakePaymentsUsingNetworks()to check the shopper's card networks are supported by your merchant configuration. - Use TestFlight to validate real invocation behavior, since simulator testing can mask issues that only show up when an App Clip is actually launched from a code scan or link tap.
- Simulate invocation URLs directly in Xcode during development, so you're not burning a TestFlight build every time you tweak the invocation handler.
Pro Tip: Test on a device with no cards enrolled in Wallet at least once. It's a scenario real shoppers hit constantly, and it's the fastest way to catch a checkout flow that breaks silently instead of degrading gracefully.
Connecting Checkout Kit To Your App Clip On Shopify
If you're building on Shopify, you don't need to build the Apple Pay sheet logic from scratch. Checkout Kit embeds a native checkout sheet directly inside your App Clip, and it already handles Apple Pay as a supported payment method alongside cards and other wallets.
What the SDK takes care of for you:
- Rendering the checkout UI itself, including payment method selection and the Apple Pay button.
- Managing the checkout lifecycle and firing callbacks when the shopper completes, cancels, or hits an error.
- Keeping the checkout experience consistent with what Shopify ships and maintains, so you're not reinventing PCI-sensitive UI.
What stays on your plate as the merchant or developer:
- Inventory and stock logic upstream of the checkout URL you hand to the SDK.
- Fulfillment and post-purchase workflows once the order lands.
- Preserving your storefront's branding around the embedded checkout sheet, since the sheet itself follows Shopify's design.
In practice, integration comes down to passing a checkout URL into the SDK, implementing the callbacks to update your App Clip's UI and reset the cart state, and making sure your branding wraps that native checkout cleanly. Embedded checkout through Checkout Kit tends to beat a hosted, browser-redirect checkout for App Clips specifically because it avoids bouncing the shopper out of the native experience mid-purchase, which is exactly the friction App Clips exist to remove.
Where Should The Apple Pay Button Go?
Apple's own Human Interface Guidelines for Apple Pay are specific about this, and ignoring them tends to show up directly in conversion numbers. A few rules matter more than the rest:
- Place the Apple Pay button early, on the product page or cart summary, rather than burying it behind a multi-step checkout form.
- Collect any required variant or configuration choices, size, color, quantity, before invoking Apple Pay, so the payment sheet doesn't have to interrupt itself to ask a question it can't answer.
- Keep the visual experience cohesive from tap to confirmation; sending a shopper out to an external browser mid-payment defeats the purpose of the App Clip entirely.
- If you're acting as an intermediary, a marketplace, a booking platform, a reseller, label that relationship clearly in the Pay line so the shopper knows who's actually charging them.
Pro Tip: Apple's guidance also recommends handling errors inside the payment sheet itself rather than dumping the shopper back to a blank screen. A card decline should feel like a recoverable hiccup, not a dead end.
Debugging The Most Common Apple Pay Failures In App Clips
Most Apple Pay problems inside App Clips trace back to one of a handful of causes, and a consistent debugging routine saves hours of guessing.
- Simulate invocations in Xcode first, then confirm with TestFlight. Xcode simulation is fast for iteration, but it can't fully replicate real-world scanning conditions, so don't treat it as your final signal before shipping.
- Run device capability checks before touching PassKit. Confirm
canMakePaymentsand your supported networks actually match what the test device has provisioned, and use Apple's test cards rather than live cards during QA. - Watch for full-app precedence. If the shopper already has your full app installed, iOS opens that instead of the App Clip, which means your Apple Pay flow in the App Clip never even fires. Test this scenario deliberately.
- Handle missing contact or shipping data explicitly. Some Apple Pay accounts won't have every field populated in Wallet; your code needs a graceful fallback, not a crash.
- Log the payment token lifecycle end to end and validate every response from your payment service provider. Most "Apple Pay just doesn't work" reports turn out to be a token that decrypted fine on Apple's side but got rejected somewhere in the merchant's own backend validation.
Keeping Your App Clip Small Enough To Launch Instantly
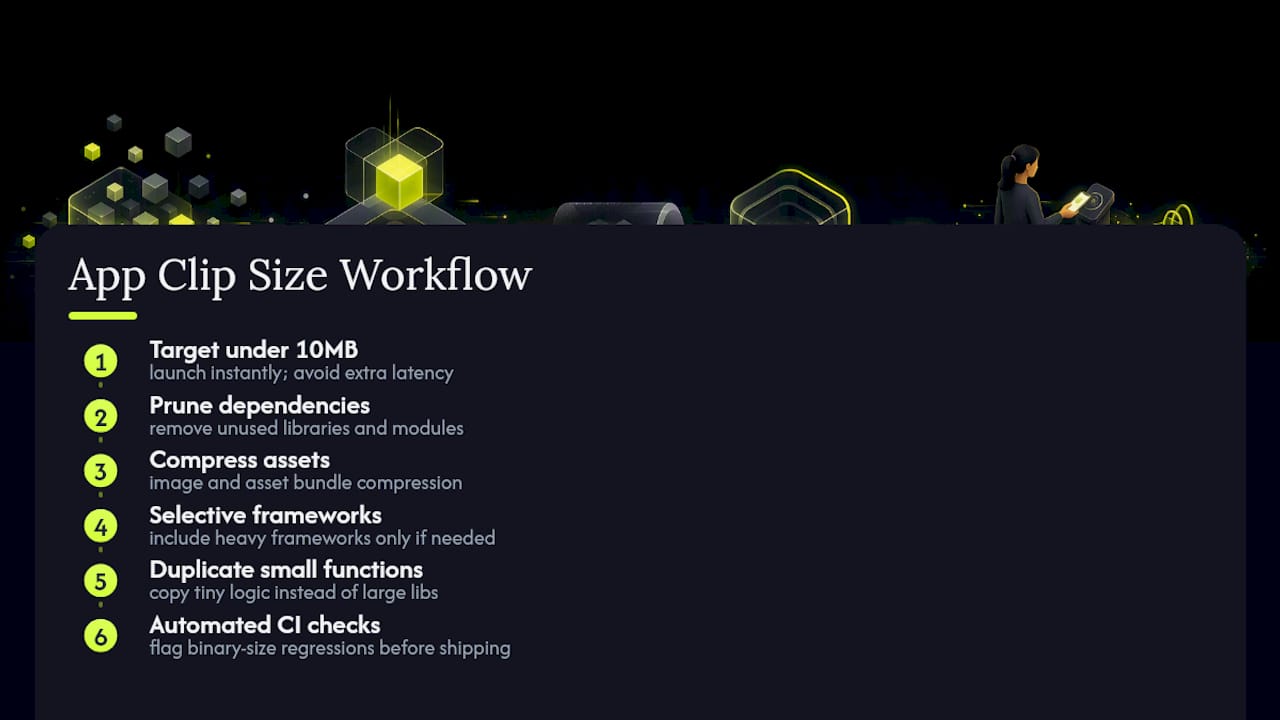
Size is not a cosmetic detail with App Clips, it's the entire value proposition. Apple's general guidance points developers toward keeping App Clips well under a 10MB target, because every extra megabyte adds launch latency at the exact moment a shopper decided to buy something. A three-second delay at that moment costs you the sale you built the App Clip to capture.
A few tactics keep size in check: prune dependencies aggressively, compress image and asset bundles, and avoid pulling in heavy frameworks unless the checkout genuinely needs them. Sometimes it's cheaper to duplicate a small function into the App Clip target rather than share a large library wholesale with your full app. Add automated CI checks that flag binary-size regressions before they ship, not after a support ticket tells you conversion dropped.
What Happens After The App Clip Checkout Ends?
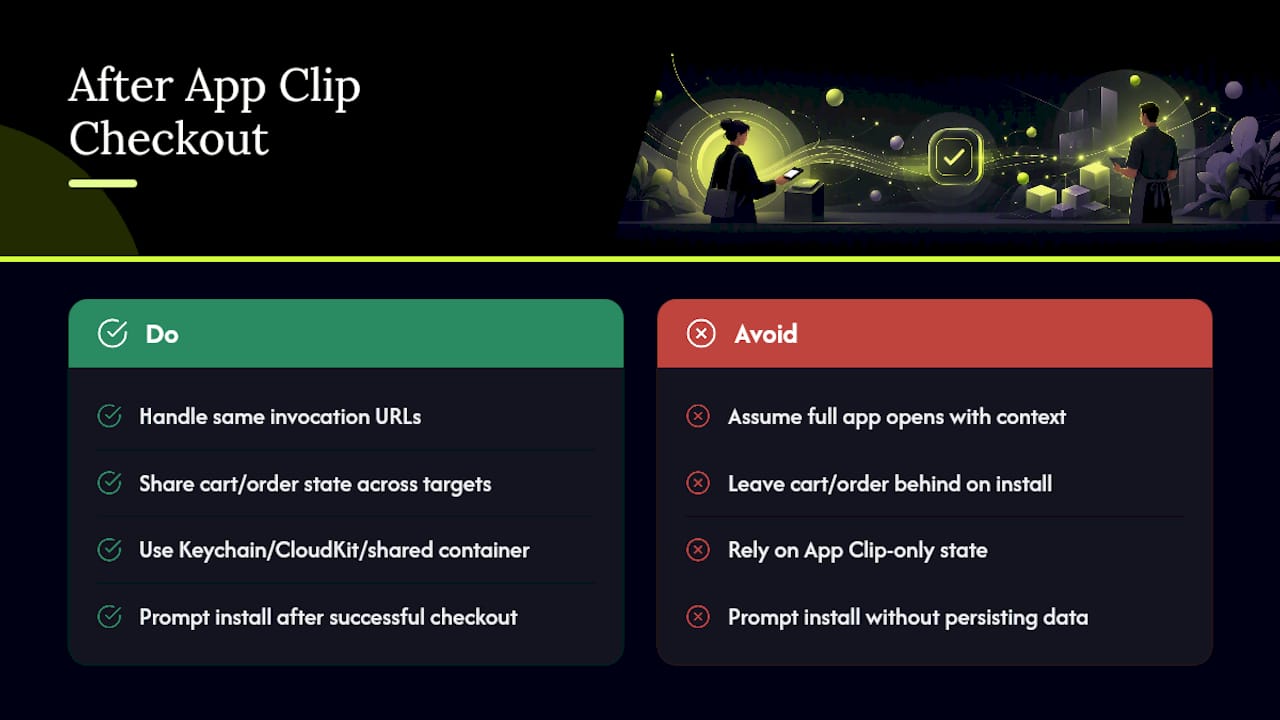
If a shopper already has your full app installed, iOS opens the full app instead of the App Clip. That's the full-app precedence rule, and it means your full app has to handle the same invocation URLs the App Clip responds to, or that shopper loses the exact context, cart contents, product page, promo code, that got them there.
Shopify's engineering team has documented this constraint directly: consistent invocation URL handling across both targets keeps the experience intact regardless of which one actually opens. Shared containers, Keychain, or CloudKit can carry order and cart state between the App Clip and the full app, so a shopper who completes checkout in the App Clip and later installs the full app doesn't land on an empty screen.
Prompting for a full install after a successful App Clip checkout is a reasonable next step, but only if the order details, receipt, tracking, reorder options, follow the shopper into that install rather than getting left behind.
How App Clip Checkouts Set Up Smarter Re-Engagement
An App Clip checkout gives you almost nothing in the traditional sense, no email, no phone number, no account. What it does give you is a device-level signal: a real purchase or near-purchase moment, tied to a device that can receive a lock-screen notification without any personal data changing hands. This is the gap StorePush was built around. Rather than waiting on an email address that never gets collected, a lock-screen re-engagement approach tied to App Clip activity can reach a shopper who abandoned checkout or completed one but never came back. What to capture at that App Clip moment:
- The invocation source (App Clip Code, NFC tap, link, or Smart Banner) so you know which channel is actually converting.
- Cart or product state at the point of abandonment, so a follow-up notification can reference something specific.
- Completion or drop-off timestamps, which feed directly into funnel and CTR analysis.
Wiring those signals into a re-engagement tool built for App Clip behavior turns a one-time checkout event into an ongoing recovery channel, without ever asking the shopper for a single piece of contact information.
Practical Trade-Offs Worth Weighing Before You Ship
Every App Clip checkout project runs into the same tension: binary size versus feature completeness, and testing complexity versus shipping speed. Full-app precedence adds another layer developers routinely underestimate. My tactical advice: ship a lightweight version first to validate invocation and payment flows, then build out feature parity once you know real shoppers are actually completing purchases.
— Lucas
Turning App Clip Checkouts Into Recovered Revenue
An App Clip checkout solves the moment of purchase. It doesn't solve what happens to the majority of visitors who never reach that moment at all. StorePush fills that specific gap: it re-engages shoppers who abandon a cart or browse session using native iOS lock-screen push notifications, without requiring an email address, a phone number, or an app install.
For merchants running on Shopify, WooCommerce, BigCommerce, or a custom storefront, StorePush plugs into the same App Clip and checkout events already firing on your site, then layers on revenue attribution, funnel tracking, and CTR heatmaps so you can see exactly which push moments turn into completed orders. If you're already investing engineering time into Apple Pay and App Clip checkout, closing the loop on the shoppers who don't convert is the next logical build. Book a demo to see how it wires into your storefront's existing checkout flow.
Sources
- App Clips | Apple Developer Documentation
- Checkout Kit — Shopify developer docs
- Make purchases using Apple Pay - Apple Support